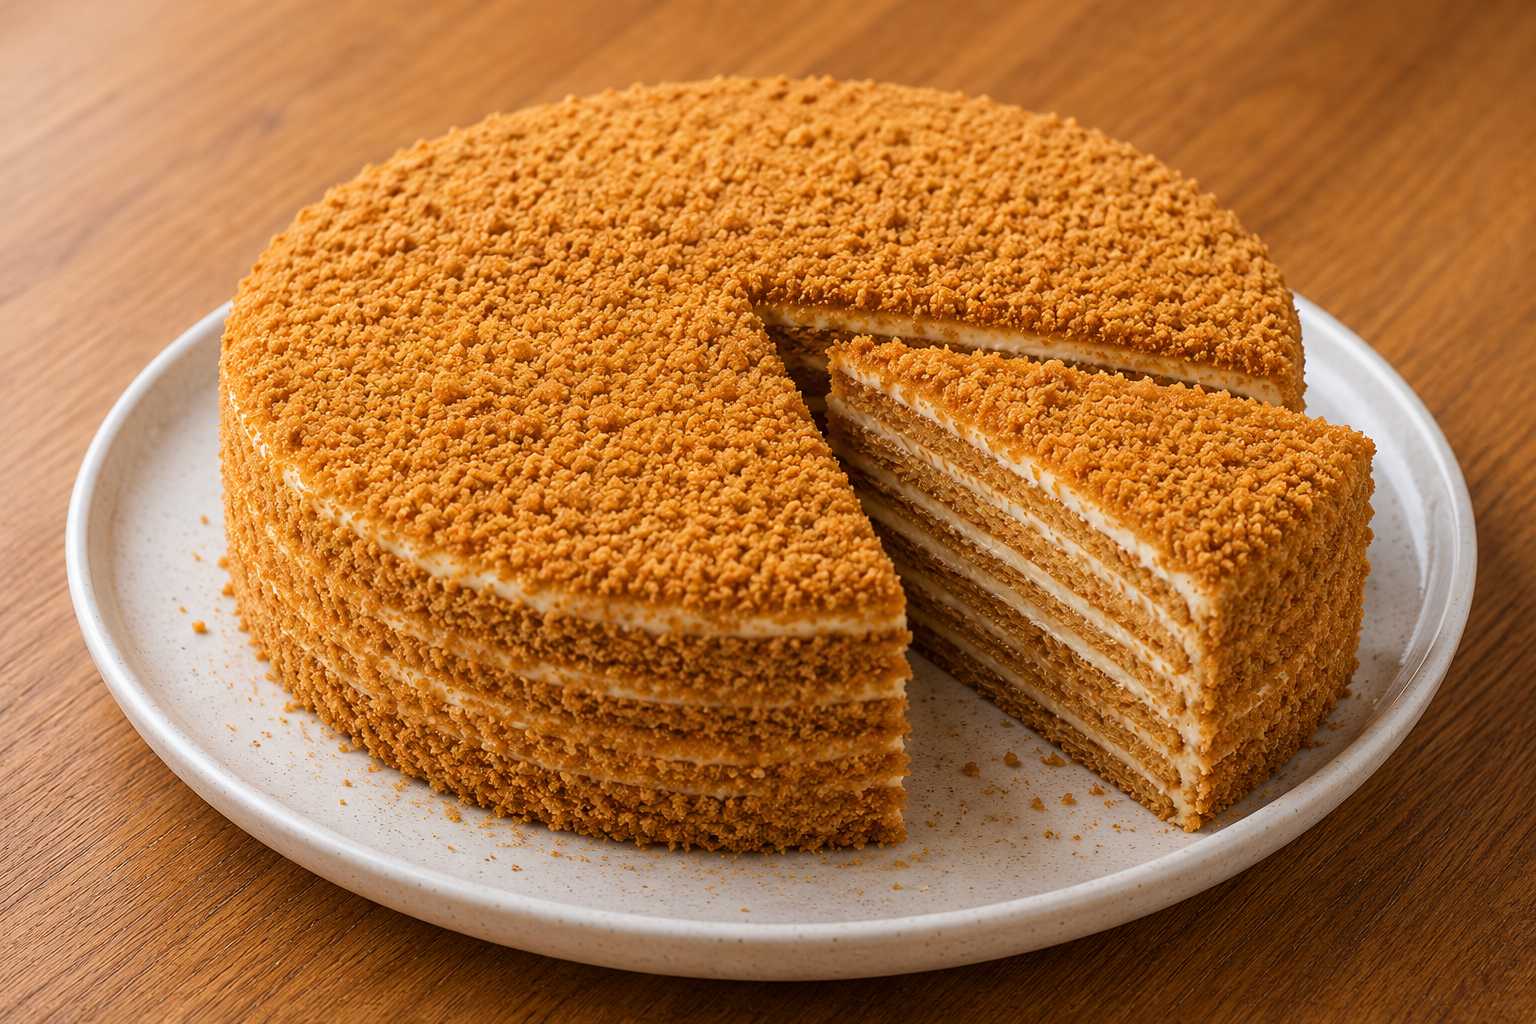
요약: 메도빅은 러시아의 전통적인 꿀 케이크로, 여러 겹의 얇은 꿀 케이크 시트와 크림이 층층이 쌓여 부드럽고 촉촉한 식감을 자랑합니다. 캐러멜과 견과류 풍미가 풍부하며, 섬세한 신맛이 특징인 인기 디저트입니다. 촉촉하고 부드러운 맛으로 러시아인들이 즐겨 찾는 특별한 날의 케이크이기도 합니다.
조리법: 꿀, 설탕, 버터, 달걀 등을 중탕으로 섞어 만든 반죽을 여러 개의 얇은 시트 형태로 구워냅니다. 이렇게 구워진 얇은 꿀 시트들 사이에 사워크림이나 연유를 기반으로 한 크림을 층층이 바르고 쌓아 올려 완성하며, 보통 8겹 이상으로 만들어집니다.
문화적 의미: 메도빅은 러시아를 비롯한 동유럽 지역의 대표적인 전통 디저트입니다. 여러 겹의 얇은 시트와 크림이 특징이며, 생일이나 기념일 등 특별한 날에 가족이나 친구를 위해 직접 만들거나 선물하는 경우가 많습니다. 오래 숙성될수록 맛이 깊어져 만드는 데 시간과 정성이 필요한 케이크로 알려져 있습니다.
사용자 입력 정보
음식명: medovik
키워드: 러시아 팬케이크
기본 정보
Slug: medovik
등록일: 2026-05-12 16:53:19
마지막 업데이트: 2026-05-25 02:48:49
추정 원산지: RUS
추정 언어: ru
소스: llm
📚 AI가 참고한 관련 정보
AI가 정보를 생성하기 위해 수집하고 분석한 자료들입니다.
RU 언어 자료
(총 19개)
▼
1. Отдаю! Божественный и пушистый, нежный и с деликатной ...
검색 결과 미리보기:
28 мая 2020 г. ... 47K likes, 1169 comments - belonika on May 28, 2020: "Отдаю! Божественный и пушистый, нежный и с деликатной кислинкой, лучший Медовик в моей ...
2. Русский медовик, который я сделала на день рождения мужа
검색 결과 미리보기:
27 сент. 2025 г. ... Моя первая попытка сделать Медовик - восточноевропейский медовый торт! Медовые коржи имеют вкус карамели - почти как кофейный кекс - и прекрасно ...
3. I made my husband medovik(Russian honey cake) for his birthday ...
검색 결과 미리보기:
8 янв. 2022 г. ... 5.9K votes, 126 comments. Thus looks incredible. What recipe did you use? I've always wanted to make one of these but the burnt honey step ...
검색 결과 미리보기:
Продукты питания: выпечка, колбасы, консервы, замороженные продукты, офощи, крупы, напитки. Экспресс доставка по Сеулу и отправка почтой по всей Корее ...
6. Торт песочный «Медовик» (1,7кг) - Русский Каравай
검색 결과 미리보기:
Описание. Состав: сметана (пастеризованные сливки, мезофильная закваска), мука пшеничная в/с, сахар-песок, вода питьевая, мед цветочный натуральный, ...
검색 결과 미리보기:
30 сент. 2022 г. ... Торт Медовик. На водяной бане подогреть 160 гр сахара, 160 гр слив масла, 200 гр мёда до однородной массы, пока масло не растает. Добавить ...
검색 결과 미리보기:
В основе торта медовые коржи из отборной пшеничной муки, пропитанные сливочным кремом на вареном сгущенном молоке. В начинке большое количество грецкого ореха.
10. Мой первый опыт приготовления русского медовика : r/Baking
검색 결과 미리보기:
9 дек. 2024 г. ... Положите яйца, сахар, мед и масло в кастрюлю на малом огне или на водяной бане, если необходимо. Постоянно, но медленно помешивайте. Вы не ...
검색 결과 미리보기:
Flag for Рус Рус · Flag for Հայ Հայ · Flag for Eng Eng · Дан Десерт. Главная ... Медовик. 4,060֏. Сочетание медовой прослойки и фирменного крема ...
14. [homemade] My first attempt at Medovik - almost like coffee cake
검색 결과 미리보기:
7 июл. 2022 г. ... I know this is old, but I just discovered honey cake and was wondering if it was similar to sans rival. Thanks for answering my super ...
17. Торт Медовик домашний 650 г – Интернет-магазин У Палыча в ...
검색 결과 미리보기:
Торт декорирован медовой крошкой, сахарной пудрой и фирменной медалью из шоколадной глазури. Необычное оформление этого десерта с рисунком медовых сот не ...
검색 결과 미리보기:
Медовое многослойное пирожное с нежной прослойкой из вареной сгущенки. В составе использован натуральный мед. Любимый многими классический медовый торт украсит ...
검색 결과 미리보기:
19 дек. 2012 г. ... It's a classic Russian recipe that has been loved for generations. Medovik-12. Medovik is, hands down, my favorite cake and is totally worth ...
러시아식 꿀케이크 메도빅(Medovik)만들기 : 네이버 블로그 본문 바로가기 블로그 카테고리 이동 Ojos de Noche 검색 집밥의 달인이 되고싶어요 러시아식 꿀케이크 메도빅(Medovik)만들기 willona 2019. 3. 1. 23:39 이웃추가 본문 폰트 크기 조정 가 공유하기 URL복사 신고하기 동생생일 선물대신 케이크를 구워주기로 했다. 러시아 갔을 때 먹었던 꿀케이크가 엄청 맛있었다고 했던게 기억에 남았는지 그걸로 만들어 달라고 해서 꿀케이크를 굽기로 결정했다. 레시피는 유튜브네이버 블로그구글링해서 이것저것 조합했다. 메도빅은 만드는 과정에서 손이 많이 가고, 숙성의 시간을 가져야 한다. 그래서 며느리가 시집가면 김장대신 메도빅을 같이 굽는다는 이야기가 있다고 한다. 그런 사실을 미리 알았다면 티라미수나 만들었겠지만 이미 만들어준다고 했기 때문에 돌이킬 수 없었다..... 계란풀기 가루류는 미리 체 쳐서 준비해놓고 버터는 상온에 둬서 말랑해질 때 까지 놔둔다. 계란은 잘 풀어준 다음 계량해둔 설탕을 넣고 덩어리 진 부분이 없게끔 잘 섞어준다. 그 다음엔 꿀케이크의 핵심인 꿀을 반죽에 넣어준다. 꿀이 주르륵 흐르는 모습을 보시고 계십니다 그 다음엔 준비해 놓은 반죽을 중탕하면서 익혀준다. 아까 버터를 잘 녹여서 써야한다고 말했는데, 나는 못그래서 저렇게 버터가 덩어리져 있다.... 어쨌든 큰 냄비에 물을 받아서 끓인다음 반죽이 든 볼을 올려서 저어가면서 익히면 된다. 스테인리스로 된 볼이기 때문에 뜨거워지니까 꼭 장갑을 끼고 저으세요!!! 반죽이 꿀냄새를 풍기면서 어느정도 거무스름한 빛을 띄면 꺼내라고 했는데 색깔이 아무리 저어도 안변하는 것 같아서 ㅠㅠ 15분정도 였나? 하여튼 저어주다가 포기하고 꺼냈다... 진심 꿀케이크는 한단계 한단계가 고난의 연속이다. 포기하고 싶었지만 생일선물이니까 어떻게 포기하지도 못하고... 계속 하는 수 밖에 없었다. 그렇게 완성한 반죽 이제 반죽을 작은 공모양으로 나눠서 빚어줘야 한다. 메도빅의 시트는 얇게 굽는게 생명이기 때문에 반죽을 적당한 양으로 잘 나눠줘야 한다. 물론 나는 잘 못나눠서 시트가 엄청 두꺼워 졌다...ㅜㅜ 꿀이 들어간 반죽이라서 보통 밀가루 반죽이랑은 차원이 다르게 잘 들러붙는다. 그래서 꼭 도마에 밀가루를 충분히 발라놓고 작업을 해야지 안그러면 나처럼 설거지할 때 지옥을 만나게 될 것이다. 우리집에는 밀대도 없고 케이크틀도 없는 관계로 마늘빻는 절구공이를 이용해서 밀어줬다. 찍어낼 틀 대신으로는 냄비뚜껑을 썼는데, 사이즈 맞추기가 엄청 힘들었다. 하지만 더이상 물러날 곳이 없었으므로 계속 시트를 만들어 줍니다. 처참하게 들러붙은 반죽 오븐이 예열되는 동안에는 크림을 만들어줬다. 내가 메도빅에 반한 이유는 설명할 수 없는 새콤한 맛 때문이었는데 레시피를 찾아봤더니 사워크림을 샌딩한다고 했다. 홈플러스가면 팔겠거니하고 마음 편하게 잠들었는데, 없어서 사워크림 만드는법도 검색해야 했다. 그랬더니 사워크림 만드는데만 3일... 그래서 야매로다가 그릭요거트에 생크림이랑 레몬즙이랑 섞어서 휘핑했다ㅋㅋㅋㅋㅋㅋㅋㅋ 오른쪽의 노란빛을 띄는 크림은 연유크림이다. 무가당 연유를 사용해야한다고 했는데, 그런게 있을 리가 없기 때문에 여름에 팥빙수하고 남은 연유를 때려부었다. 그렇게 혼자 난리를 치고 나니까 오븐예열이 끝났다. 절구로 밀어준 시트를 넣고 15분정도 구워냈더니 이렇게 퍼석퍼석해 보이는 빵이 나왔다. 원래 메도빅의 시트는 거의 쿠키처럼 딱딱하게 나오는게 정상이기 때문에 놀랄 필요는 없다. 대신 식고나면 틀로 찍어내기가 어렵기 때문에 오븐에서 꺼내자마자 찍어내는 것이 좋다. 남은 테두리 부분은 모아두었다가 케이크 데코에 사용하면 된다. 포슬포슬한 빵가루를 표면에 올려주는데, 나는 믹서로 갈았더니 거의 미숫가루가 되버렸다... 그렇게 시트를 한장씩 구워주면 한시간 정도 걸린다... 지옥의 기다림굽혀나온 시트는 창문열고 식혀주면 된다. 시트가 뜨거우면 크림이 녹아서 흘러내리기 때문에 꼭 식혀줘야 한다 드디어 완성된 시트들! 이제 크림만 발라주면 끝이다 접시는 너로 정했다 시트를 올리기 전에 먼저 접시에 크림을 약간 발라주라고 했다왜인지는 모르겠지만... 일단 시키니까 따라해봅니다아마 시트가 흔들리지 말라고 바르는 거 아닐까 추측해봄 슥슥 발라주세요 크림은 연유크림이랑 사워크림을 번갈아가며 샌딩해주면 된다 남은 크림은 다 섞어서 겉에 발라줍니다 엉망진창... 이제 빵가루를 만들차례! 지퍼백에 넣어서 방망이로 부술까 생각했는데, 지퍼백이 자꾸 터져버려서 어쩔 수 없이 믹서기로 바꿨다. 입자가 좀 굵은걸 원했는데, 믹서로 갈았더니 완전 모래수준으로 갈렸다 ㅠㅠ 우유에 부어서 먹어도 될만큼 고운 가루가 되버린 너.... 이렇게 만든 가루는 케이크 겉에 뿌려주면 된다. 요령도 기술도 없는 나는 뿌리고 났더니 접시고 식탁이고 엉망진창이 됐다...나처럼 전체를 다 뿌리려고 시도하는 것도 좋겠지만 위에만 뿌려도 괜찮을 것 같다. 훨씬 깔끔하게 장식할 수 있을거라고 생각합니다. 이건 내가 상트페테르부르크에서 먹었던 꿀 케이크다원래대로라면 이런 모양이 나왔어야 하지만... 내가 만든 케이크는 이것보다 색도 연하고 모양도 이상했다.. 완성된 케이크는 23일간 냉장고에서 숙성을 거친 뒤 먹으면 된다! 난 물론 생일전날 만들어서 하루만 숙성시켜 먹었지만 뭐 나름 괜찮았다고 생각한다. 아빠가 먹어보더니 오묘한 맛이지만 먹을수록 생각나는 맛이라고 칭찬아닌 칭찬을 했다. 그래놓고 더 안먹은걸 보면 생각만 나고 먹고싶지는 않은 맛이었나 보다... 결국 내가 거의 다 먹었다ㅋㅋㅋㅋㅋㅋㅋㅋ 그래도 맛있어... 크림이 더 새콤하고 시트가 얇았으면 훨씬 맛있었을 것 같다. "title":"러시아식 꿀케이크 메도빅(Medovik)만들기","source":"https:blog.naver.comthsdmlwjd022221478098802","blogName":"Ojos de ..","domainIdOrBlogId":"thsdmlwjd022","nicknameOrBlogId":"willona","logNo":221478098802,"smartEditorVersion":4,"meDisplay":true,"lineDisplay":true,"outsideDisplay":false,"cafeDisplay":true,"blogDisplay":true 이 블로그 홈 취소 이웃추가
검색 결과 미리보기:
9 янв. 2026 г. ... Medovik is a traditional 8 layer honey cake from Russia, and truly one of a kind. It is soft, moist, with lots of caramely-nutty flavour, and just enough tang ...
Russian Honey Cake (Medovik) My Yummy Spatula 0 Russian Honey Cake (Medovik) CakesAutumn Desserts Jan 9 Written By Rajeshwari Kanodia Medovik is a traditional 8 layer honey cake from Russia, and truly one of a kind. It is soft, moist, with lots of caramely-nutty flavour, and just enough tang from the sour cream to beautifully balance out all that honey goodness. Fun fact: did you know that this cake was created back in the 19th century by a young confectioner, who whipped up this cake with honey sour cream, without realising that the empress actually hated honey? But of course, the cake was so good that she fell in love with it! So if youre on the fence about this cake, the empress can vouch for it. As delicious as this cake is, it is also a labour of love. Its not a difficult cake, however, it is labour intensive. So get ready to get hands on. There are only two components to this cake, as the outer coating is just an extension of the cake:Cookie like cakes, that are thin and crispy when baked but soften like a sponge after assemblySour cream frostingAnd most of the time consuming part happens with the cake layers itself. Lets talk about this confusing cake situation. So, if youve ever tried your hand at this cake, you know theres a lot of different recipes out there that can be very confusing. Some are thick cake batters, some are runny cake batters, some are cookie doughsits madness. Luckily, Ive done all the research so that all you gotta do is go ahead and enjoy this cakeand of course make it, but thats part of the fun. After doing a fair bit of research and going through a good few traditional recipes, this is what Ive concluded. The traditional way of making this cake is by making cookie like cake layers, that are thin and crispy when baked, but as you assemble and let the cake sit overnight, the cookies absorb some of the moisture from the frosting to get soft and cakey. The result- youre left with 8 beautiful layers of soft, moist, dreamy cake. RecipeServes: 8IngredientsFor the burnt honey:100g honey2 tbsp cold water For the cake:85g honey30g burnt honey (from above)67g light brown sugar80g salted butter, cubed12 tsp vanilla paste110g eggs 2 large eggs340g plain flour34 tsp bi-carb soda12 tsp cinnamon powder14 tsp saltFor the sour cream frosting:380g heavy cream (minimum 35 fat)160g sour cream50g burnt honey (from above)20g light brown sugar20g hazelnuts, roasted and chopped, optionalMethodFor the burnt honey:In a small saucepan, add the honey and place over medium heat. Cook until the honey starts to caramelise, turn deep amber in colour and starts smoking just a little 8-10 mins. Remove from heat and add the cold water. Stir to combine. Keep warm.For the cake:Preheat oven to 190C.In a large bowl, add the honey, burnt honey, butter, brown sugar and vanilla paste. Place over a bain marie. Cook until all the butter melts and the mixture is hot. Whisk occasionally to combine well. Remove from heat and keep aside for a couple of minutes to cool down. Meanwhile, whisk the eggs in a small bowl. Keep aside.Weigh out the dry ingredients and sift together. Whisk to combine. Keep aside. Start whisking the honey-butter mixture and pour the eggs into it in a steady stream.Add the dry ingredients and stir to combine well. It will look like a thick sticky gingerbread dough. Divide the dough equally into 4 (174g each). Transfer one portion to a silpat, place baking paper on top and roll out to 3mm thickness. Remove the paper.Grease a 15cm cake ring with oil and cut two circles. The dough will be sticky so do not try to remove the excess. Bake for 8-10 mins or until the deep golden brown. (It can take 11 mins if using silpat.)While the first batch is baking, repeat the process with the second portion. Repeat with the remaining portions. You should have 8 layers of cake. Put all the excess trimmings on a baking tray and bake for another 5-6 mins or until totally crispy. Cool down and then blitz to a coarse crumb. Keep aside. Well use this to cover the cake. For the frosting:In the bowl of a stand mixer, add all the ingredients and whip on medium speed until medium stiff peaks form. Refrigerate until use.For the assembly:Place a layer of cake on a plate or a 7 inch cake board. Add a generous dollop of the frosting and spread evenly using a palette knife. Place another layer of cake on top. Repeat until all the cake layers have been used up.Cover the top and sides of the cake with frosting and smoothen out using a palette knife. Refrigerate for 5 mins. Use your hands to completely cover the cake with the coarse crumbs. Clean off any excess from the plate. Refrigerate for minimum 8-10 hours. If you have any frosting leftover, transfer to a piping bag and refrigerate for later.To finish: pipe the leftover frosting on top. Garnish with roasted hazelnuts. Cut into slices and serve with a cup of coffee.Notes:- The quality of your honey will determine the flavour of the cake. Use good quality honey for best flavour. - I find this to be the quickest way to do this. If you do not have a cake ring, you can trace out a 15cm circle on baking paper and use as template. Make sure to grease the baking paper before putting it onto the dough. In this cake, it is better to divide the dough into 8 pieces and roll individually. This recipe is only suitable for 15cm cake. If you want a bigger cake, youll have to scale the recipe. If you enjoyed that and tried it at home, please tag me at myyummyspatula on Instagram so that I can see all your bakes! For more BTS stories, updates and fun, you can follow long here: russian honey cakemedovikhoney cakehoney dessertsRussian dessertsbest honey cakebest russian honey cakehoneycomb cakehoneycombsour cream frosting Rajeshwari Kanodia Previous Previous Tulumba Tatlısı Next Next Pistachio Doughnuts
검색 결과 미리보기:
12 февр. 2026 г. ... Cake Layers. Instead of making cake batter and baking it in cake pans this honey cake recipe calls for preparing cookie dough, then baking the ...
Russian Honey Cake Medovik (8 Layer Cake) Skip to contentSign up for free weekly recipes! Updated Feb 12, 2026This post contains affiliate links. When you purchase through our links, we may earn a commission. This iconic Russian honey cake aka tort Medovik is something everyone needs to try at least once. Layers upon layers of honey goodness filled with the most delicious cream. Its quite unforgettable. Loving this cake recipe? For another classic Russian cake try my Apple Cake Sharlotka. Honey Cake The Russian name for this incredible cake is Medovik or Tort Medovik. And the first time I made it I was 13 or 14 when this cake was the it cake where I lived. The recipe was being passed on from one household to another although, of course there wasnt one master recipe. Every cook made it her own. It was impossible to have any sort of celebration without Medovik crowning the meal. It was so common that after a while it didnt seem special anymore. I am glad I re-discovered this treasure because despite its simplicity of ingredients and the method of preparation the end result is far from plain. Ingredients Honey in Russian is med, so you can expect honey to be one of the dominant ingredients in this cake. Although only 4 tablespoons is used, they add a very rich, caramel like flavour to the cake. This is due to a high quality, flavourful honey thats been traditionally used in Russia. My grandfather came for a beekeeping family and as a child I always remember seeing a large 3 litre jar of raw honey being stored in a kitchen cupboard. So using great tasting honey is the key to the unforgettable taste of this honey cake. The rest of the ingredients are very common for cakes. Butter, sugar, flour, baking soda and vanilla extract make thin, cookie like layers of Medovik. They are softened with a cream filling that is one part whipping cream and one part sour cream mixed with sugar and vanilla. Sometimes a filling made with butter and sweetened condensed milk is used. I however, find it too sweet. How to make Tort Medovik Although the ingredients for this honey cake are quite common for a cake, the method of preparation is quite unorthodox. Cake Layers Instead of making cake batter and baking it in cake pans this honey cake recipe calls for preparing cookie dough, then baking the layers one by one on cookie sheets in a preheated oven. Baking the thin layers is the lengthiest process according to this method but trust me, it produces the most stellar results. This cake is so impressive that after it got discovered and reproduced by one San Francisco bakery, it developed a cult following! After the layers are baked they are cut into round circles or rectangles. As you can see in the photos, I went with rectangles. When Medovik is made for large gatherings its not uncommon to make it into a large rectangular 4 layer cake instead of a tall 8 layer one. Both are authentic and equally delicious. Traditionally Medovik cake is covered with the cake crumbs that are made from the offcuts from the layers. Honey Cake Filling Beat sour cream or creme fraiche with whipping cream, sugar and vanilla until sugar is dissolved and its doubled in volume. Fill all 8 cake layers except for the top and the sides. Medovik Frosting Once again Ive changed the frosting as in the original Medovik. The filling above is used for the outside of the cake as well and later coated with the cake crumbs. Since I decided to go crumb free, Ive used a mascarpone frosting similar to the one Ive used for my Naked Cake. Recipe Tips and Notes You really do want to make this cake a day ahead of when you plan on serving it. The cake needs time to soften and for the honey and frosting to work its way through to provide the most flavour. Watch the cake layers closely as they bake since they can quickly. Honey is not all created equal, especially when it is highly processed. Since so much of this cake is built around honey flavour, youll get better results by using the highest quality honey you can find. I prefer to go with dark honey to get the most flavour. Storage and leftovers The cake is best served 24 hours after its made to allow the crispy layers to soften to a cake texture. A full day in a fridge is perfect for soaking the wonderful flavours from the filling and the frosting. Store it in an This is an affiliate link.airtight container if you have one so it doesnt dry out or absorb flavours from your fridge. Plastic wrap can also work. The time you can store the cake is limited by the mascarpone icing. The cake will keep for 3-4 days when refrigerated. Take it out of the fridge before serving so it can come to room temperature. More popular cake recipes to try Honeycomb Crunch Chocolate Cake Victoria Sponge Cake Frostbitten Raspberry Cake Red Velvet Truffle Cake Russian Honey Cake Medovik By Julia Frey of Vikalinka Prep: 30 minutes minsCook: 2 hours hrsTotal: 2 hours hrs 30 minutes minsServings: 12 SaveSaved Pin Print 8 layers of honey goodness with creamy filling, adorned with caramel flames this cake Medovik is a stunner! EquipmentThis is an affiliate link.Hand mixerThis is an affiliate link.Mixing bowlsThis is an affiliate link.Offset spatula Ingredients For the cake 70g5 tbsp unsalted butter 100g12cup granulated sugar 4 tbsp honey, I prefer dark honey for more flavour 3 eggs, large 1 tsp This is an affiliate link.vanilla 1 tsp baking soda 12 tsp salt 330g3 cups all purpose flourFor the filling 500ml2 cups creme fraiche or sour cream 500ml2 cups double creamwhipping cream 50g12 cup icing sugarpowdered sugar 1 vanilla bean, or 1 tsp vanilla For the frosting 250g1 cup mascarpone, chilled 125ml12 cup double creamwhipping cream 100g1 cup icing sugar 1 vanilla bean, or 1 tsp vanilla Instructions For the cake Preheat your oven to 400F200C and line two baking trays with parchment paper. Set a double boiler or a large pot filled 23 with water and a glass or metal bowl over it on the medium heat. Melt butter, sugar and honey in the bowl. In a separate bowl beat eggs and vanilla and pour the mixture in the double boiler while mixing the whole time (I use electric mixer) to avoid ending up with scrambled egg.Then add baking soda, salt and 2 cups of flour, continue mixing for a few minutes until the dough starts to thicken and come away from the edges of the bowl. Take it off the heat and add the last cup of flour, mix well. Be careful as the dough will be hot.Allow it to cool for a couple of minutes and then knead it with your hands until your get smooth, pasta like dough. What you are looking for is a cookie dough rather than a cake batter. Divide into 8 equal parts and cover with a kitchen towel to avoid drying out. The cake layers will be baked separately on baking trays and then cut into neat circles using a 7 cake pan, tart pan or, in my case, a pan lid as a template.Dust your work surface with flour and roll out a thin circle slightly larger than 7, transfer on a parchment lined baking tray and bake for 4-5 min. Watch closely as the cake layers burn quickly. Roll out the next layer while the previous one is baking. That is why you need to have 2 baking trays on the go. Remove from the over when golden brown and cut out a circle while still hot as the layers will turn into crisp biscuits in a couple of minutes.For the fillingBeat creme fraiche or sour cream with whipping cream, sugar and vanilla until sugar is dissolved and its doubled in volume. Fill all 8 cake layers except for the top and the sides.For the frostingBeat cold mascarpone with icing sugar, vanilla and whip cream until stiff. For the US users whip the whipping cream first with icing sugar then fold into slightly whipping mascarpone. Cover the sides and the top of the cake with mascarpone frosting. Notes It needs to be noted that the cake is best served 24 hours after its made. A full day in the fridge allows crisp layers to soften and soak all the wonderful flavours from the filling and the frosting. You can cut your layers into large rectangles and make your Medovik into a 4 layer cake. Keep an eye on the cake layers as they bake since this can happen quickly. Not all honey is the same, especially if it is highly processed. Since so much of what makes this cake great is the honey flavour, you will get better results by using the best quality honey you can find. I prefer to use dark honey because it has the most taste. NutritionCalories: 682kcal Carbohydrates: 70g Protein: 8g Fat: 42g Saturated Fat: 25g Cholesterol: 163mg Sodium: 267mg Potassium: 144mg Fiber: 1g Sugar: 44g Vitamin A: 1474IU Vitamin C: 1mg Calcium: 116mg Iron: 2mg Nutrition information is automatically calculated, so should only be used as an approximation. 7656 shares Facebook X Email About Me Julia Frey is a London based recipe developer and photographer. Julia founded Vikalinka in 2012 with the main mission to provide her readers with delicious and accessible everyday recipes, which could be enjoyed by everyone. Learn More 38 Comments Is there a way to print the recipe? Reply Yes, just the click the Print button in the recipe card. Reply I can canadianized it a bit by using 34. Honey and 14 maple syrop. It turned out quite good. I used wild flower honey, unpasteurized, and grade A maple syrup and I used the Crumb coating with a drizzle of home made caramel sauce. Reply I love that you used maple syrup here, Adrian. I am going to give it a try. This Canadian family will be thrilled. Reply This looks delicious and Im excited to try it. Is the frosting stable enough to pipe? Reply Yes it is! Reply Great recipe. I reduced the sugar, and it still turned out incredibly caramel-y. Reply Somehow I think this cake is going to turn out fine in spite of my novice A couple of notes: following the recipe exactly because I am a novice, something did not come across or wasnt explicit enough I beat the filling for more than 80 minutes, but it barely gained any volume, certainly not double. The caramel for the flames definitely never became clear it did burn while I stirred furiously waiting for it to become clear though, badly Reply Hi Daniel, I am glad you attempted this cake even though you are a novice as you say. Practice makes perfect! Regarding your difficulties: 1. The frosting should double in volume since you are whipping heavydouble cream and thats how it generally works. Beating it for 80 minutes seems more than excessive. It should take no longer than 5 minutes using an electric mixer. Beating heavy cream longer will warm it up, then turn it into butter, which makes sense why your never achieved the volume. 2. In the instruction for making caramel I indicate it should be done over medium heat to avoid burning. Overall, well done I am sure youev learned a lot and enjoyed your cake! Reply Hi Julia, just made your Russian honey cake, followed your recipe but omitted the mascarpone frosting because I had so much filling, enough to cover the cake. Its Thursday 7pm where I am, will this cake still be OK for Saturday 7pm if I leave it in the fridge? I dont have time to make it tomorrow so I thought Id make it 2 days in advance. Thank you! Reply Hi Samantha, yes it will be absolutely fine in the fridge. I would store it in an air-tight cake box if you have one to keep it moist and it also keeps the cake from absorbing smells in the fridge. Reply Delicious thank you !! I had one question, I made it into am 8 layer cake, and the filling disappeared from the bottom layers how do you keep even layers of icing between each layer, when the top layers of the cake are so heavy? Thank you again. Reply Hi Maria, unfortunately not much could be done against gravity. Reply how many servings does this recipe do please? Reply Hi Diana, 12 servings. You can usually see that info in the recipe card. Reply Your recipe calls for icing sugar could you please explain? Thank you! Reply Icing sugar is just another name for powdered sugar in the UK and Canada. Reply This cake is totally WOW worthy! My husband was so impressed when I made it for our early Valentines dinner. Delicious! Reply Its perfect for Valentines day!! Reply As Featured In2026 Vikalinka. All rights reserved. Privacy Policy Accessibility Statement Powered by CultivateWP.
8-Layer Honey Cake Recipe (Medovik) Recipes Search this site AppetizersBread RecipesBreakfastCondimentsCopycat RecipesDessertsDrinksEntertainingKid FriendlyMain CourseSaladsSandwichesSide DishesSoupsSourdoughTacosCuisineAmerican RecipesAsian RecipesEastern European RecipesFrench RecipesItalian RecipesGerman RecipesGreek RecipesMexican RecipesDietKetoGluten FreeVegetarianPaleoIngredient SearchHolidayThanksgivingChristmasCinco de MayoEasterPatriotic RecipesValentines DayMethodAir FryerGrillingInstant PotSlow CookerCanningFreezer Friendly30-Minute MealsHow To CookCookbookVideosCooking ChallengeAbout 8-Layer Honey Cake Recipe (Medovik) by Natasha Kravchuk Updated Nov 27, 2019 4.86 from 304 votes 834 comments This honey cake is so soft and fantastic. The honey baked into the cake layers pairs perfectly with the simple sour cream frosting. This post may contain affiliate links. Read my disclosure policy. For my own safety, Ive been delivering quarters of this goodness to various family members and Ive received rave reviews across the board. It stays amazing in the fridge for a several days (the longest weve tested was 4 days), so this is also a great make-ahead cake. Woot! Its definitely a special occasion cake and will WOW your crowd, but its easier to make than typical Russian honey cakes that require a double boiler. This ones not that sensitive, making it more attainable for everyone. Woot! Woot! Honey Cake Layers Ingredients: 4 Tbsp (14 cup) honey 34 cup granulated sugar 2 Tbsp unsalted butter 3 large eggs, room temperature, beaten with a fork 1 tsp baking soda 3 cups all-purpose flour (I used unbleached, organic) measured correctly Sour Cream Frosting Ingredients: 32 oz sour cream 2 cups powdered sugar 1 cup heavy whipping cream For the topping: 12 lb Fresh Berries, optional How to Make a Honey Cake: 1. Add 34 cup sugar, 14 cup honey and 2 Tbsp unsalted butter to a medium sauce pan and melt them together over mediumlow heat, whisking occasionally until sugar is melted (5-7 mins). Dont put them over high heat or they may scorch to the bottom. 2. As soon as the sugar is dissolved, remove from heat and while its still hot, add in your beaten eggs in a slow steady stream while whisking vigorously until all of your eggs are incorporated (whisk constantly so you dont end up with scrambled eggs). 3. Whisk in the baking soda until no lumps remain, then fold in your 3 cups flour 12 cup at a time with a spatula until the dough reaches a clay consistency and doesnt stick to your hands. Mine took exactly 3 cups flour (measured precisely, scraping off the top of the cup). Watch our easy video tutorial on how to measure correctly! 4. Cut the dough into 8 equal pieces and move on to the next step right away (these roll out best when the dough is still warm) 5. On a well-floured surface, roll each piece out into a thin 9 circle (about 18 thick). You can sprinkle the top with a little flour too to keep dough from sticking to your rolling pin. Place a 9 plate or base from a springform mold over your rolled dough and trace around it with a pizza cutter to get a perfect circle. Keep the scraps for later. Transfer the dough to a large sheet of parchment paper and bake 2 at a time at 350F for 4-5 minutes or until golden. Transfer to a wire rack and let cool completely before stacking. Repeat with remaining layers 6. Finally bake the scraps separated evenly on a re-used sheet of parchment.Once the scraps are baked, cooled and firm, you can crush them with a rolling pin or pulse them in a food processor until you have fine crumbs. Tips for Success: Roll out the next layers while the first ones are in the oven and total combined baking time shouldnt take more than 25-ish minutes. Some of mine bubbled up a little on top which is fine since after its frosted, it wont make a difference. I deflated any real whopping bubbles after they came out of the oven. Oh and I re-used my parchment paper (because Im frugal that way). If you dont have a baking sheet large enough to place the parchment paper on, just bake directly on the rack (thats what I did!) How to make the frosting: 1. Beat 1 cup heavy cream until fluffy and stiff peaks form (1-2 min on high speed). 2. In a separate bowl, whisk together 32 oz sour cream with 2 cups powdered sugar. Fold the whipped cream into the sour cream and you have your frosting. Refrigerate until ready to use. Assembling your Cake: 1. Spread about 13 cup frosting on each cake layer (the frosting will be loose, but dont skimp on it since the cake needs to absorb some of the cream to become ultra soft. Press the cake layers down gently as you go to keep the layers from having air gaps. Frost the top and sides with the remaining frosting 2. Dust the top and sides with your breadcrumbs, then cover with plastic wrap and refrigerate overnight. This cake needs time to absorb some of the cream and soften, so be patient. Its worth the wait! Heres the Print-friendly for your recipe books: 8-Layer Honey Cake Recipe (Medovik) 4.86 from 304 votes Author: Natasha of NatashasKitchen.com SaveSaved Pin Review Print Prep Time: 2 hours hrsCook Time: 25 minutes minsTotal Time: 2 hours hrs 25 minutes mins Ingredients Servings: 12 slicesCake Layers Ingredients:4 Tbsp honey, (14 cup)34 cup granulated sugar2 Tbsp unsalted butter3 large eggs, room temperature, beaten with a fork1 tsp baking soda3 cups all-purpose flour, I used unbleached, organicSour Cream Frosting Ingredients:32 oz sour cream2 cups powdered sugar1 cup heavy whipping creamFor the topping:12 lb strawberries, optional InstructionsHow to Make The Cake Layers:Add 34 cup sugar, 14 cup honey and 2 Tbsp unsalted butter to a medium sauce pan and melt them together over mediumlow heat, whisking occasionally until sugar is melted (5-7 mins). Don't put them over high heat or they may scorch to the bottom.As soon as the sugar is dissolved, remove from heat and while it's still hot, add in your beaten eggs in a slow steady stream while whisking vigorously until all of your eggs are incorporated (whisk constantly so you don't end up with scrambled eggs).Whisk in the baking soda until no lumps remain, then fold in your 3 cups flour 12 cup at a time with a spatula until the dough reaches a clay consistency and doesn't stick to your hands. Mine took exactly 3 cups flour (measured precisely, scraping off the top of the cup).Cut the dough into 8 equal pieces and move on to the next step right away (these roll out best when the dough is still warm)On a well-floured surface, roll each piece out into a thin 9" circle (about 18" thick). You can sprinkle the top with a little flour too to keep dough from sticking to your rolling pin. Place a 9" plate or base from a springform mold over your rolled dough and trace around it with a pizza cutter to get a perfect circle. Keep the scraps for later. Transfer the dough to a large sheet of parchment paper and bake 2 at a time at 350F for 4-5 minutes or until golden. Transfer to a wire rack and let cool completely before stacking. Repeat with remaining layers.Finally bake the scraps separated evenly on a re-used sheet of parchment. Once the scraps are baked, cooled and firm, you can crush them with a rolling pin or pulse them in a food processor until you have fine crumbs.How to make the frosting:Beat 1 cup heavy cream until fluffy and stiff peaks form (1-2 min on high speed).In a separate bowl, whisk together 32 oz sour cream with 2 cups powdered sugar. Fold the whipped cream into the sour cream and you have your frosting. Refrigerate until ready to use.Assembling your Cake:Spread about 13 cup frosting on each cake layer (the frosting will be loose, but don't skimp on it since the cake needs to absorb some of the cream to become ultra soft. Press the cake layers down gently as you go to keep the layers from having air gaps. Frost the top and sides with the remaining frosting.Dust the top and sides with your breadcrumbs, then cover with plastic wrap and refrigerate overnight. This cake needs time to absorb some of the cream and soften, so be patient. It's worth the wait! NotesTips for Success: Roll out the next layers while the first ones are in the oven and total combined baking time shouldn't take more than 25-ish minutes. Some of mine bubbled up a little on top which is fine since after it's frosted, it won't make a difference. I deflated any real whopping bubbles after they came out of the oven. Oh and I re-used my parchment paper (because I'm frugal that way).If you don't have a baking sheet large enough to place the parchment paper on, just bake directly on the rack (that's what I did!) Nutrition Per Serving514kcal Calories66g Carbs6g Protein25g Fat14g Saturated Fat112mg Cholesterol190mg Sodium202mg Potassium1g Fiber41g Sugar880IU Vitamin A11.9mg Vitamin C110mg Calcium1.9mg IronFull Nutrition LabelNutrition Disclosure 8-Layer Honey Cake Recipe (Medovik)Amount per ServingCalories514 Daily ValueFat 25g38Saturated Fat 14g88Cholesterol 112mg37Sodium 190mg8Potassium 202mg6Carbohydrates 66g22Fiber 1g4Sugar 41g46Protein 6g12Vitamin A 880IU18Vitamin C 11.9mg14Calcium 110mg11Iron 1.9mg11 Percent Daily Values are based on a 2000 calorie diet. Course: DessertCuisine: Russian, UkrainianKeyword: 8-Layer Honey Cake, MedovikSkill Level: MediumCost to Make: Calories: 514 Share the Post: (And the Pinterest friendly). Thanks so much for sharing this recipe with your friends and family. Good things are meant to be shared 4.86 from 304 votes (93 ratings without comment) Comments April 20, 2026 What temperature should the sugarhoneybutter mixture be when adding the beaten room temperature eggs? I keep getting threads of scrambled eggs in the mixture even though I am drizzling and whisking like crazy! Reply April 20, 2026 Hi Trish! I havent measured the actual temperature of the mixture. You can let it cool down slightly. It should be warm but not actively steaming. Reply April 12, 2026 Im reluctant to leave a bad review, so I wont, but I cannot for the life of me figure out what went wrong. I know how to properly measure flour, and Ive made innumerable standard cakes, but this one- I could not get the dough to get clay textured and not sticky. It just stayed so sticky even with a layer of flour on a silicone sheet, it just stuck. I tried adding flour until it got less sticky, but four cups of flour deep its still fairly sticky and now so floury there is no chance it will taste good. I put some of the batter in the oven just out of curiosity to see what it would do, but I couldnt get it thin because it was so sticky. All I could manage is these sticky, floury patties of dough. Should I have just kept adding flour? Four and a half cups seems so extreme. Ive made so many cakes before; I dont know why this one has gone so wrong. The dough just refuses to get less sticky. Im so disappointed- I love this cake when I get it from bakeries Reply April 15, 2026 Hi Mischa! Im sorry to hear it didnt work out well for you. Do you live in a humid climate? This could make the dough more sticky. Adding more flour wont necessarily help. You could try to roll it between parchment paper layers. Lightly flour, but dont keep kneading flour in. You could also chill the dough slightly and work in small portions. I find it works best when the dough is warm, but you can see if it helps. Reply April 12, 2026 This cake was fantastic! After reading reviews I set a cup of flour by my rolling area, ended up using about half of it. My layers were definitely thinner than 18 inch, but thats due to making it while exhausted and my sub-par rolling skills. Made for book club and everyone raved. Will definitely make again, finished product looks way more difficult than it actually is. Reply April 4, 2026 I wonder if you could do a large baking sheet and cut into smaller pieces after it cooks to make it bigger or would it not be able to be cut once baked? Reply April 4, 2026 Hi Margaret, I havent tried that myself to know if it will work. I worry it will crack. Reply March 29, 2026 Ive made this cake multiple times and after a couple it becomes quite quick and easy and its delicious every time!! Reply March 9, 2026 Thank you for this excellent recipe and tips. Weve made it three times, firstly for our Ukrainian lodgers first birthday in the UK and then made a rainbow layered version for our sons birthday. He now wants one every year. We did find the mixture a bit tricky to roll out but we got there. Reply February 11, 2026 The icing was a disaster. I followed verbatim using full fat sour cream, whipping cream and icing sugar. It was not stiff enough to ice a cake. I threw the whole drippy mess into the garbage. What a waste of expensive, high quality ingredients. Reply February 12, 2026 Im sorry to hear it didnt work out for you. Make sure to use heavy whipping cream and not just whipping cream which is lighter in fat and wont get as stiff when whipped. Reply February 13, 2026 Icing is not supposed to be thick. It should be a consistency of sour cream because those crispy layers need extra moisture to get soft and soaked through over night. If your icing is too drippy, you did something wrong. Based on reviews and the fact that me and my friends baked by this recipe dozens of times, i can tell you that it is an awesome easier than traditional recipe for the cake. Reply February 18, 2026 If you cant bake just say that Ive made this cake many times and thats just how the frosting is. Its not like American cakes. Reply February 27, 2026 Sounds like user error! Dont dock points from the author because you likely arent using the right ingredients. I TRULY follow her instructions to a T and this comes out absolutely delicious every single time. Dont be so quick to anger Reply January 13, 2026 Hi Just wondering if you are giving a recipe credit to author Kate Quinn since your recipe is verbatim to her recipe in her novel, The Briar Club? Reply January 13, 2026 Hi Nicole. Its actually credited to Natashas Kitchen, since it was this recipe that was used in the book. I hope you get to try it and love it. Reply January 14, 2026 Thank you for your response and clarification. Cannot wait to try it!! Reply April 4, 2026 Hello, what ingredient can I replace to make this cake with condensed milk? Reply April 4, 2026 Hi Evie! I havent tested that substitution. January 11, 2026 Truly delicious and not as difficult as difficult to make as you might think. My only problem was that frosting was a bit too runny and the cake layers were sliding. My notes to self are to tweak the ratio of powdered sugar to sour cream (more sugar, less sour cream). Then refrigerate the frosting for a hour before attempting to build the cake. Thank you for sharing this recipe Reply January 10, 2026 Can I make the layers a few weeks in advance and freeze them? Reply January 10, 2026 Hi Deb, The cake layers can be kept at room temperature for a few days, refrigerated, or frozen for longer storage. Be sure to let t...
검색 결과 미리보기:
Medovik – Russian Honey Cake. Noopur. 6 years ago. Jump to Recipe. Medovik Russian Honey Cake – layers of caramelized honey goodness with creamy tangy sour ...
Medovik - Russian Honey Cake From Noopur's Kitchen June 12, 2020June 12, 2020 Noopur Medovik Russian Honey Cake Jump to Recipe Medovik Russian Honey Cake layers of caramelized honey goodness with creamy tangy sour cream filling its a showstopper dessert sure to create a statement! I first encountered this cake while traveling through Eastern Europe and fell instantly in love with it. (Insert missing travel hashtags and emojis!!) Its taste reminds me of Dutch stroopwafels and honey biscuits. It might sound like a rich heavy cake, but its in fact surprisingly light with flavours of burnt honey taking it to another level! (honey is not burnt technically, just caramelized) Baking the layers This Medovik Russian Honey Cake is totally worth every ounce of effort that it took to make the layers. I put on some music and got into a production line. I drew two circles of 7 on 3 sheets of parchment papers that fit my baking tray perfectly. One sheet inside oven, one ready to go, and one getting rolled and prepped. Divide the dough into 8 parts, roll them on the circle you drew. Using the 7 ring or a pan for reference, cut into neat circles to match the circles drawn. Do not discard the extra well bake them to make the crumbs to cover the final cake! Poke some holes with a fork and they are ready to be baked. These take just 8-9 minutes to bake! The hardest part of all was to chill this cake overnight in fridge for the layers to soften and soak up flavours. While the thin layers harden shortly after coming out of the oven, the moisture of the filling softens it again over time. Ill be more generous with the frosting between layers next time since they get absorbed by the layers as the cake sits. If you dont have access to sour cream or cannot make your own, you can use a mix of cream cheese and Greek Yogurt instead. Its really interesting to discover and experience what different countries have to offer in terms of food and specially desserts! Check out the recipe for Chimney Cake (Kürtöskalács in Hungarian or Trdelník in Czech)! Follow me on Instagram noopurskitchen. Dont forget to click, share and tag noopurskitchen when you try this recipe out! I love looking at all your creations. Print Pin Medovik Russian Honey Cake Layers of caramelized honey goodness with creamy tangy sour cream filling it's a showstopper dessert sure to create a statement! Course Dessert Cuisine International, Russian Prep Time 1 hour hour Cook Time 45 minutes minutes Resting Time 8 hours hours Total Time 1 hour hour 45 minutes minutes Servings 8 slices Author Noopur IngredientsCake Layers100 g honey85 g unsalted butter100 g Caster Sugar3 regular eggs½ tsp salt¾ tsp baking soda400 g All Purpose Flour1 tsp vanilla extract½ tsp cinnamon powder optionalFrosting350 g sour cream60 g icing sugar40 g honey1 tsp vanilla extract350 g heavy whipping dairy cream skip the icing sugar if using non-dairy whip topping InstructionsPrepare Burnt HoneyIn a deep saucepan, cook HALF of the honey on medium heat for about 8-10 minutes till it turns deeper caramel brown colour. Turn off the heat and add 2-3 tbsp of cold water to stop it from cooking further. Keep aside to cool completely.Prepare Cake BatterIn a saucepan, heat the butter, sugar, burnt honey and regular honey for about 5 minutes. Remove the pan from heat and whisk in the baking soda. The mixture will bubble and get lighter in color. Let it cool to lukewarm. Add the vanilla and salt and mix. Transfer to a large bowl.Whisk the eggs in a separate small bowl. Add the eggs to the butter-honey mixture slowly while continuously whisking to incorporate all the eggs properly.Sift in the flour and fold it in. You'll get a soft cookie-like dough. Cover it and keep the dough in fridge for about 15 minutes.Bake the cake layersPreheat the oven to 180C. Prepare 3 parchment sheets the size of your baking tray. Draw 2 circles of 7" on each (or one on each if your oven is smaller). Divide the dough into 8 equal pieces (about 100g each). Roll each piece on the circles you drew on parchment paper. Cut them into exact 7" round with the cake ring. Reserve the extra scraps for baking at the end.Prick each disc with a fork. Bake them for 8-9 minutes at 180C till they turn evenly golden brown.Transfer the sheet to a cooling rack and transfer the next parchment paper with discs. Bake them all two at a time (or one at a time depending on your oven size). Bake the reserved cuts for about 8-9 minutes until golden. Cool completely. Pulse them in a food processor to fine crumbs and reserve them for decoration later.Prepare the frostingIn a large bowl, mix the sour cream, icing sugar, honey and vanilla.In another chilled bowl with a chilled whisk, whip the cream until stiff peaks. Gently fold in the sour cream mixture until well combined.Assemble the cakeAdd a little frosting on your platter and put one cake disc on top. Spread 2 large spoonfuls of frosting evenly across the layer. Repeat the process for all 8 layers of cake. Cover the whole cake on top and sides with frosting.Transfer the cake to refrigerator to chill completely and let the layers soften.When ready to serve, cover the whole cake with the crumbs. You can also pipe some whipped cream on top for decoration. Cut into slices and enjoy! Notes If you dont have access to sour cream or cannot make your own, you can use a mix of cream cheese and Greek Yogurt instead. Related Reply the sweet-toothed, Russian desserts like medovik (honey layer cake) and syrniki (cheese pancakes) offer indulgence without overwhelming richness. Reply Continue reading Go to mobile version d
검색 결과 미리보기:
11 янв. 2026 г. ... Russian honey cake (Medovik) made with thin baked honey layers and a whipped dulce de leche frosting. The cake is assembled and refrigerated ...